How to Burn Netflix Movies to DVD [Latest Guide]
By Cara Miller
Updated on Nov 10, 2025
4.9K views
5 min read
When you want to enjoy your favorite Netflix content offline, simply to keep a personal copy, or even watch Netflix on car DVD player, you only find that Netflix downloads are limited on iOS and Android devices and all downloaded content is protected by DRM, which restricts copying and burning to physical formats like DVDs. But there is still a way out: downloading Netflix movies to MP4 then burning them. In this guide, we’ll walk you through the necessary tools and the step-by-step process of how to burn Netflix movies to DVD.
Related Article:
What You Need Before Burning Netflix to DVD
Before you begin the process of burning Netflix movies to DVD, it’s essential to gather the necessary tools and resources. Here’s what you’ll need:
- A Computer with a DVD Burner: A DVD burner is necessary to write data onto blank DVDs, converting your digital movie files into a format compatible with standard DVD players. If your computer doesn’t have a built-in DVD burner, you can easily purchase an external DVD burner that works with both Windows and macOS. Ensure the burner supports DVD-R or DVD+R formats, as these are the most widely accepted by DVD players.
- Blank DVDs: You’ll need DVD-R or DVD+R discs, which are commonly used for burning movies. These discs can store up to 4.7GB of data (or 8.5GB for dual-layer discs). High-quality blank DVDs are recommended for better data integrity and playback reliability. If you’re burning high-definition movies or longer films, consider using dual-layer DVDs for the additional storage capacity.
- Netflix Downloading Software: To download Netflix movies, you’ll need specialized software that can bypass Netflix’s DRM protections and convert the content into a downloadable format like MP4, MKV, or MOV. Tools like TuneFab VideOne Netflix Downloader and StreamFab Netflix Downloader are popular options. Choose software that preserves the original audio and video quality and is regularly updated to stay compatible with Netflix’s DRM technology.
- DVD Burning Software: After downloading the movie, you need to use DVD-burning software to create a DVD. BurnAware and DVDStyler are reliable options that allow you to import movie files, configure settings, and create a DVD with a menu for playback on any standard DVD player. These programs often include features like video editing and menu customization, ensuring a professional final product.
By thoroughly preparing with these tools and software, you’ll be well-equipped to start the process of burning Netflix movies to DVD, ensuring a smooth and efficient workflow. Burning Netflix movies to DVD involves a few detailed steps, from downloading the movies in a compatible format to finally burning them onto a DVD. We’ll break down the process into two main parts. By following these steps, you can create a personal DVD collection of your favorite Netflix content.
Part 1. How to Download Netflix Movies in MP4/MKV/MOV Format
The first step in burning Netflix movies to DVD is to download the movies in a DRM-free format that is compatible with DVD-burning software. Since Netflix does not allow direct downloads in widely used video formats, you’ll need specialized software to do this. One highly recommended tool is TuneFab VideOne Netflix Downloader.
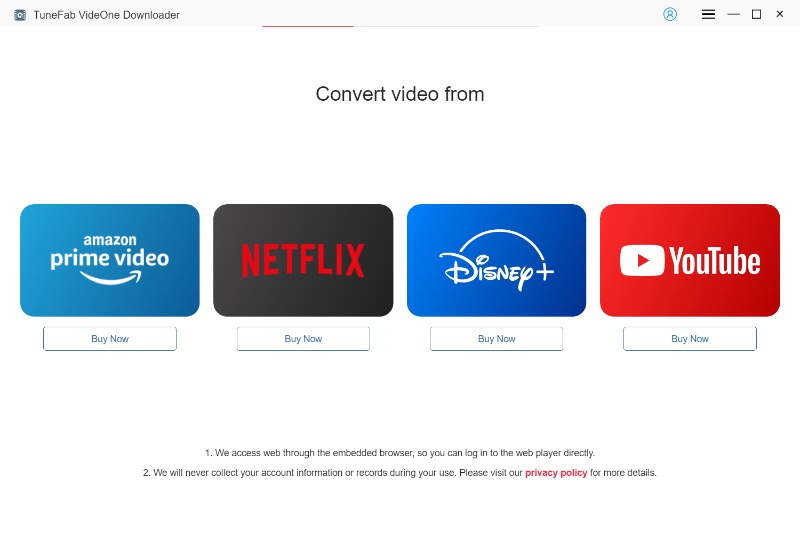
TuneFab VideOne Netflix Downloader is specifically designed to handle Netflix content, allowing you to download Netflix movies and shows to MP4, MKV, and MOV. Whether you’re aiming to preserve 1080P quality or require flexibility in subtitle types, TuneFab VideOne Netflix Downloader provides an ideal and user-friendly solution. Available for both Windows and macOS, it also supports downloading content at 3X faster speed, making it an efficient solution for offline video access.
Other Features of TuneFab VideOne Netflix Downloader:
- Supports output formats that are available for DVD burning smoothly.
- Offers options to select different audio tracks and subtitles.
- Provides hard, soft, and external subtitle download options.
- Features a user-friendly interface with integrated search and download options.
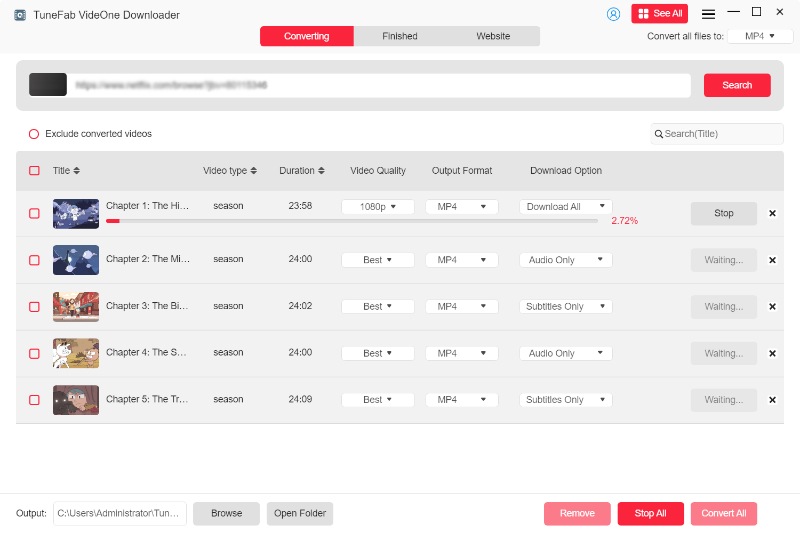
With TuneFab VideOne, you can easily download Netflix to MP4/MKV/MOV within several simple steps.
Step 1. Start by downloading and installing VideOne Netflix Downloader on your computer.
Step 2. Open the TuneFab VideOne Netflix Downloader, choose Netflix from the 4 available streaming platform options, and then log in to your Netflix account directly within the software. This will allow the downloader to access the content available in your Netflix library.
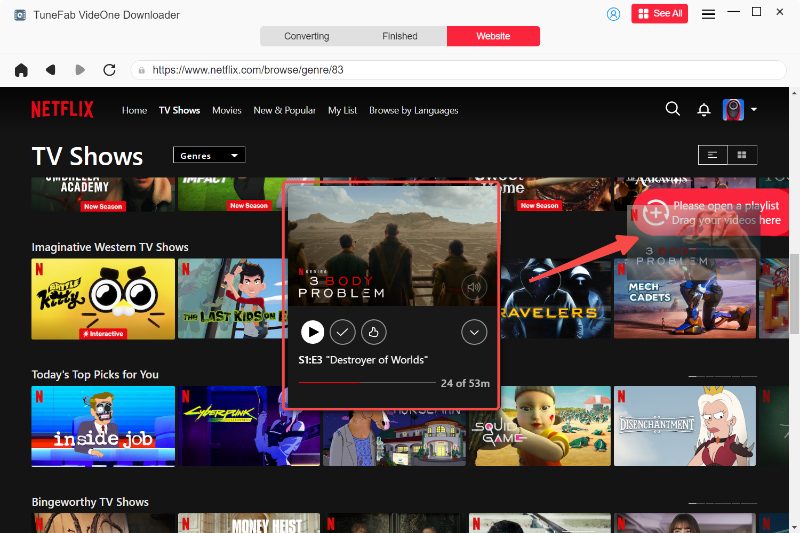
Step 3. Browse the homepage and find your desired Netflix video. To add it to the converting list, simply drag it to the red floating button.
Step 4. After selecting your movie or show, go to the “Converting” window, and choose the desired output format as MP4, MKV, or MOV, which are widely compatible with most DVD-burning software. You can also select the quality setting and subtitles to ensure the best viewing experience.
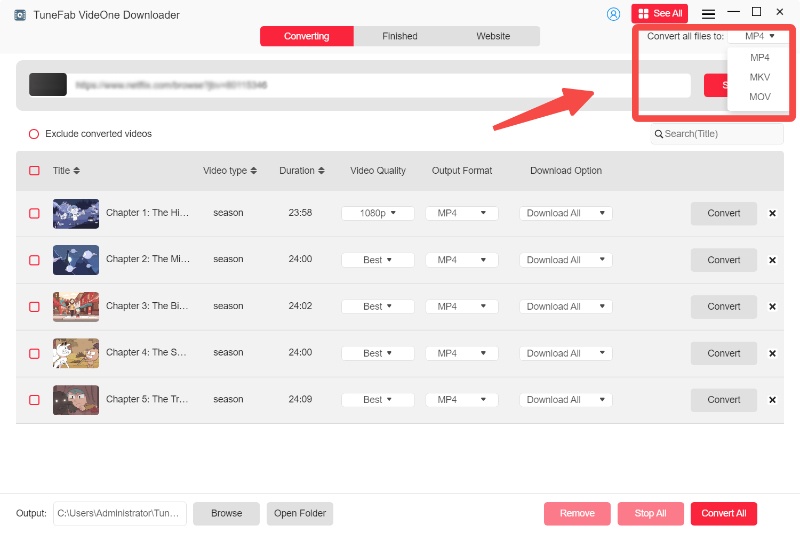
Step 5. Click the “Convert All” button to begin downloading the selected movie or show. TuneFab VideOne Netflix Downloader will save the file to your specified location on your computer. Once completed, you can go to the “Finished” section and click the “View Output File” to find the downloaded Netflix videos.
Part 2. How to Burn Downloaded Netflix Movies to DVD
Once you’ve downloaded your Netflix movies using TuneFab VideOne Netflix Downloader, the next step is to burn these movies onto a DVD. Two popular software options for this task are BurnAware and DVDStyler. Both programs are user-friendly and offer robust features for creating DVDs that can be played on standard DVD players.
Below, we’ll guide you through the steps for each tool to ensure your movies are successfully burned to DVD.
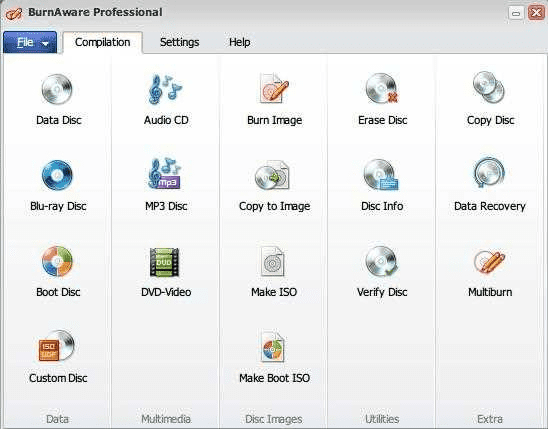
1. Burn Netflix Movies to DVD Using BurnAware
BurnAware is a comprehensive DVD-burning software that supports Windows operating systems. It offers a wide range of features, allowing users to burn data CDs, DVDs, and Blu-ray discs, as well as create bootable discs, audio CDs, and MP3 discs. Advanced features include support for creating ISO files, multi-session discs, and handling rewritable discs. With a user-friendly interface, BurnAware caters to both beginners and advanced users, providing tools for copying discs, managing ISO images, and even recovering lost data.
1. Download BurnAware from the official website and install it on your computer.
2. Open BurnAware and click on the “DVD-Video” icon in the main window to start a new project.
3. Choose between “Convert and burn” or “Burn VIDEO_TS” (if you have a prepared VIDEO_TS folder).
4. Add video files by clicking “Add Files” or dragging them from Explorer. The software supports formats like MP4, AVI, and MKV, converting them into DVD-Video format.
5. Once burning is complete, your DVD will be ready to use in any standard DVD player.
2. Burn Netflix Movies to DVD Using DVDStyler
DVDStyler is a free, open-source DVD authoring tool that allows you to create professional-looking DVDs with custom menus. It supports multiple video formats (MP4, AVI, MOV, etc.) and offers features like designing personalized menus, adding background images, text, and buttons, and adjusting aspect ratios. You can drag and drop video files and burn them directly to a DVD, making it easy for both beginners and advanced users. It works on Windows, macOS, and Linux, providing a cross-platform solution for DVD creation.
1. Open DVDStyler and start a new project. Specify your disc label, choose the DVD size (4.7 GB for single-layer or 8.5 GB for double-layer), and select the video format (NTSC or PAL).
2. Go to your movie files using the “File Browser” and drag them to the “Titleset Manager”. You can add files directly from your folders or via the file dialog.
3. Customize your DVD menu by selecting a background, adding text for titles, and inserting buttons through the “Menu Editor”. Customize each element as needed.
4. Save the project file before proceeding to burn the DVD.
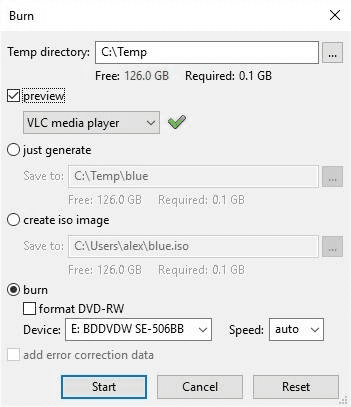
5. Click the ‘Burn’ button, insert a blank DVD, select your DVD drive, and start the burning process. Optionally, preview your DVD before burning to ensure everything is set up correctly.
Troubleshooting & Tips for Burning Netflix to DVD
Even with the right software and steps, you might encounter problems when burning Netflix videos to DVD. Here are common issues and practical solutions to make sure your DVD plays smoothly on any device.
1. The Burned DVD Won’t Play on TV or DVD Player
Possible causes:
- The DVD player doesn’t support the disc format (e.g. DVD-R vs DVD+R).
- The video format is incompatible with the player.
How to fix:
- Try using DVD-R discs for better compatibility.
- Make sure you’ve converted the Netflix video to a DVD-supported format, such as MP4 or MPEG-2, before burning.
- Test the DVD on another player or computer to confirm if the issue is with the device.
2. The Video Has No Sound or Subtitle
Possible causes:
- Wrong audio track or subtitle settings during download.
- Incomplete conversion before burning.
How to fix:
- Re-download the video using “Original Audio” and “English Subtitle” options (or your preferred language).
- Check playback in your media player before burning to ensure audio and subtitle sync correctly.
3. DVD Burning Process Fails or Freezes
Possible causes:
- Insufficient system memory or low disk space.
- Outdated burning software or unstable disc.
How to fix:
- Close other background apps during the burning process.
- Always use high-quality blank discs (e.g. Verbatim, Sony).
- If the software keeps freezing, try lowering the burning speed (e.g. 4x or 6x) for a more stable result.
4. The Burned DVD Quality Looks Blurry or Pixelated
Possible causes:
- Low download resolution or compression during conversion.
- Poor disc quality.
How to fix:
- Always download Netflix videos in 1080p or the highest available quality before conversion.
- Choose “High Quality” mode in your burning software.
- Avoid burning multiple long videos (over 2 hours) on a single disc.
5. The DVD Doesn’t Fit All Your Selected Videos
Possible causes:
- A standard DVD can only hold around 4.7 GB (~2 hours in high quality).
How to fix:
- Use a dual-layer DVD (8.5 GB) if you want to store more movies.
- Or split your content into two discs for better playback stability.
Bonus Tips for a Smooth DVD Burning Experience
- Keep your DVD drive clean and updated with the latest firmware.
- Avoid multitasking while burning to prevent data errors.
- Label your discs clearly and store them in a cool, dry place to extend their lifespan.
- If you plan to share with family, burn with menu titles or chapters for easier navigation.
FAQs About Burning Netflix Movies to DVD
Can you record Netflix to DVD?
Technically, you can record Netflix content to DVD, but it’s not a straightforward process. Netflix does not provide a built-in option for recording or burning videos due to copyright protection. To create a personal backup or offline viewing copy, you’d need to use a Netflix video recorder or screen recording tool that can capture the video in real time, then use DVD burning software to transfer the recording onto a DVD.
Can I burn Netflix movies directly without downloading?
No. Since Netflix streams videos online using DRM protection, there’s no way to transfer them straight to a DVD. You can only record or download the Netflix video using a legal tool that supports offline playback, then convert the saved file into a DVD-compatible format (such as MP4 to MPEG2).
Can I burn downloaded Netflix videos to Blu-ray?
Yes, but only if the downloaded Netflix videos are saved in a non-DRM format. Netflix’s native downloads (via the Netflix app) are encrypted and cannot be directly burned to Blu-ray.
Conclusion
Burning Netflix movies to DVD involves several steps, starting with downloading the content using a tool like TuneFab VideOne Netflix Downloader and then using DVD burning software like BurnAware and DVDStyler to burn the downloaded files onto a DVD.
While this process can be helpful for personal use, it’s important to note that burning Netflix movies for commercial purposes or sharing with others may violate copyright laws. By using the right tools and following the detailed steps, you can effortlessly create DVDs with high-quality video, menus, and customization options.