How to Download Amazon Prime Video to Hard Drive (2 Ways)
By Iris Holmes
Updated on Jan 09, 2025
26.3K views
5min read
Imagine this: You’re excited to catch up on your favorite Amazon Prime Video series, eager to download them to your computer so that you can watch them offline whether on a plane or a train. But suddenly, the Amazon Prime Video app notifies you that your hard drive is full, and the download can’t continue.
This is where an external hard drive comes in handy. With its large capacity for file storage, an external hard drive is the perfect solution for backing up high-definition movies from Amazon Prime Video.
In this guide, we’ll show you how to download movies or shows from Amazon Prime Video and transfer them to your hard drive, whether you’re using a Windows PC or MacBook/iMac. Let’s dive in!
Way 1. Download Amazon Prime Video to External Hard Drive Directly
You may already know that if you subscribe to an Amazon Prime Video plan, you can not only watch movies using the web player in your computer’s browser but also install the Prime Video app and download Amazon videos to your Mac or Windows computer for offline viewing.
Supported computer systems for installing Amazon Prime Video:
- Windows 10 & Windows 11
- macOS 11.4 Big Sur or later
Therefore, you can first change Amazon’s download location to an external hard drive, and then download Amazon Prime Video to a hard drive directly. Though it is not recommended by Amazon, it indeed allows its users to change the output file location. You can rely on this feature to free up storage space locally. Below are the steps for your reference.
Note: It should be noted that Amazon employs DRM limits on its videos. While the content seems to be on your external hard drive, you still don’t own it, but can only watch them through the Prime Video app as all the downloads are unreadable by other players. To break this, you’ll need to rip movies from Amazon Prime with a workable downloader.
On Windows
Please note that the official app is available for Windows 10 (17763.0) or later. Also, only Prime Video app downloaded from the Microsoft Store can be moved to your external hard drive.
Moreover, the setting only takes into effect when the external hard drive is connected to your computer. You should keep the two connected during the whole downloading process. The settings you made will expire once you disconnect them.
Step 1. Download, install, and launch Amazon Prime Video on your desktop, and sign in with your Prime account.
Step 2. Plug your external hard drive to your computer.
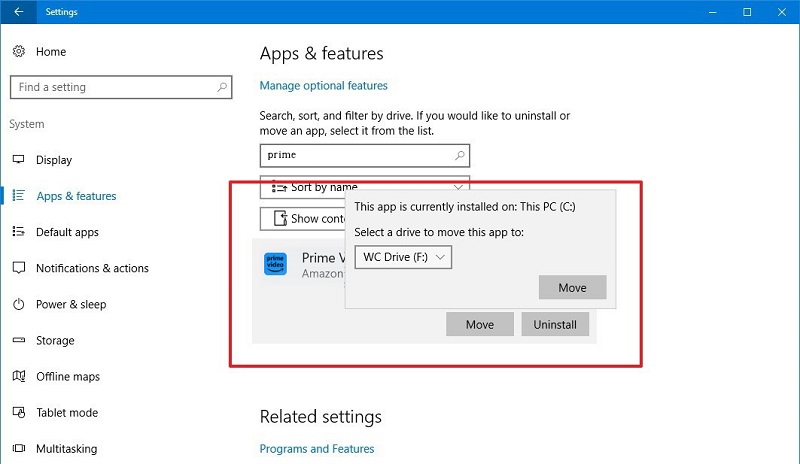
Step 3. Set the external hard drive as the file location for your Amazon downloads. Press the “Windows + I” keys to open “Settings” on your computer, and search for “Apps & features”.
Step 4. Navigate to Prime Video and tap on it, then hit “Move”.
Step 5. Select the external hard drive as the drive where you want to move the app.
Note: If you’ve previously downloaded videos on Prime Video, they won’t be transferred and may become unplayable.
Step 6. Now all new data and downloads will be directly downloaded to your hard drive. Search for the Amazon Prime title you wish to download. On the details page, click the “Download” button to save Amazon Prime video to your hard drive.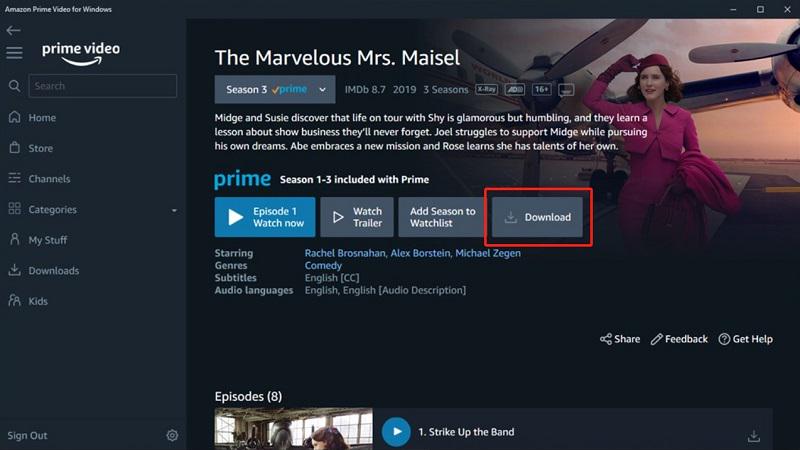
On Mac
Things can be a little bit more difficult on a Mac, as you need to make sure that your external hard drive is in APFS format that is compatible with macOS. Also, you need to make sure to check “External disks” under Finder > Finder Preferences > General so the hard drive can be displayed successfully.
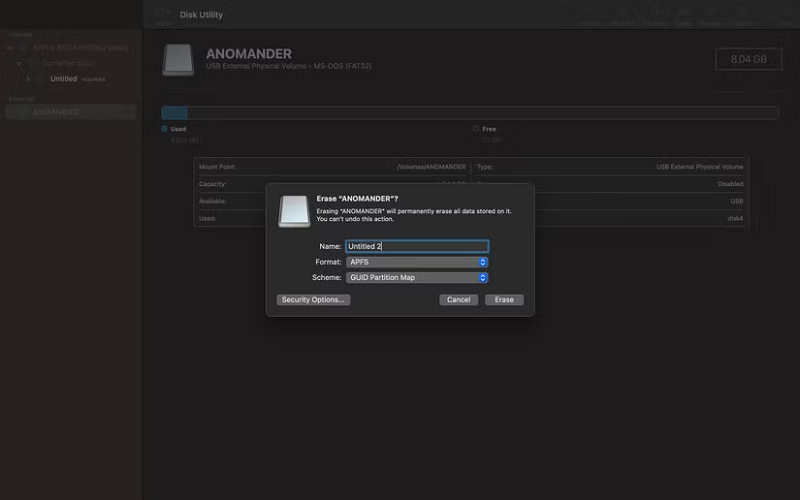
Step 1. Press the shortcut (Command + Space) to open Spotlight, then search for and open Disk Utility.
Step 2. Connect your external hard drive to your Mac, and you’ll see its name appear in the sidebar.
Step 3. Right-click on your hard drive, select “Erase”, then choose APFS under the Format option. Click “Erase” to format the drive.
Step 4.
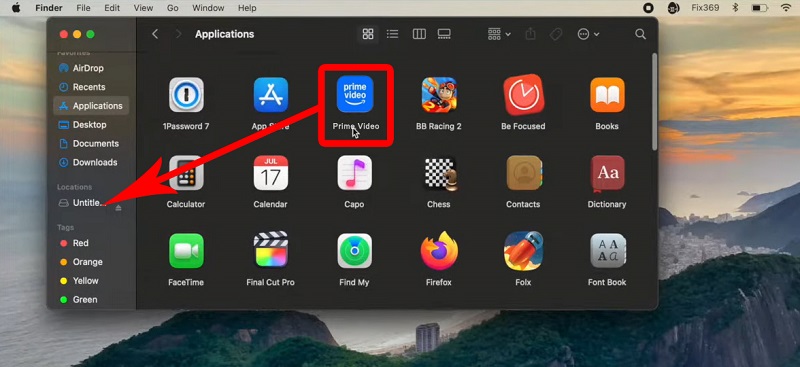
- If you’ve already installed Amazon Prime Video: Open “Finder > Application” and then search for “Prime Video”. Drag it to your external on the left sidebar and it will be moved there directly.
- If you haven’t installed the app, download and run the Amazon Prime Video app and drag it into your external hard drive.
You can now launch the app and download the movies you want, and they will be downloaded to your external hard drive.
Way 2. Download Amazon Prime Videos as MP4 Files to External Hard Drive
The methods above should help you download your desired Amazon videos to an external hard drive. However, it’s important to note that videos downloaded via the official app must be watched within 30 days; otherwise, they will expire. Additionally, once you start playback, they will expire 48 hours later. If they expire, you’ll need to download them again.
This means that even if you download these videos, they are still protected by DRM and don’t truly belong to you. Once you cancel your Amazon Prime subscription, these videos will become unplayable.
If you don’t want to deal with these limitations, you can use third-party tools to download the videos as MP4 files and save them permanently on your external hard drive.
TuneFab VideOne Amazon Downloader is what you need to get rid of all the download restrictions. With its built-in web browser, you no longer need to switch from the official app, and can directly search for your desired movies on TuneFab to download Amazon Prime content into high-definition MP4/MKV/MOV videos (up to 1080P). Even if you are a free user, you can access and obtain paid content hassle-free.
More Features of this tool:
- 3X faster downloading speed: The advanced hardware acceleration technology will boost your download speed up to 5 times as the official downloading. Say goodbye to long waits.
- Multiple choices of audio tracks and subtitles: You can choose to download movies in different languages, embedded with multi-lingual subtitles.
- 3 options for subtitle downloading: According to your preference, you can choose from hard, soft, and external subtitles.
- Audio-only downloads. You can save audio files from the video. Being stored in MP4 format, the audio file will come in smaller sizes.
- Unlock Resources for Multiple Countries: You can enjoy abundant streaming resources because the web player supports your switch from the Amazon website in the US, UK, Germany, and Japan.
Here are the easy steps to download Amazon Prime Video to MP4 with the TuneFab VideOne Amazon Downloader.
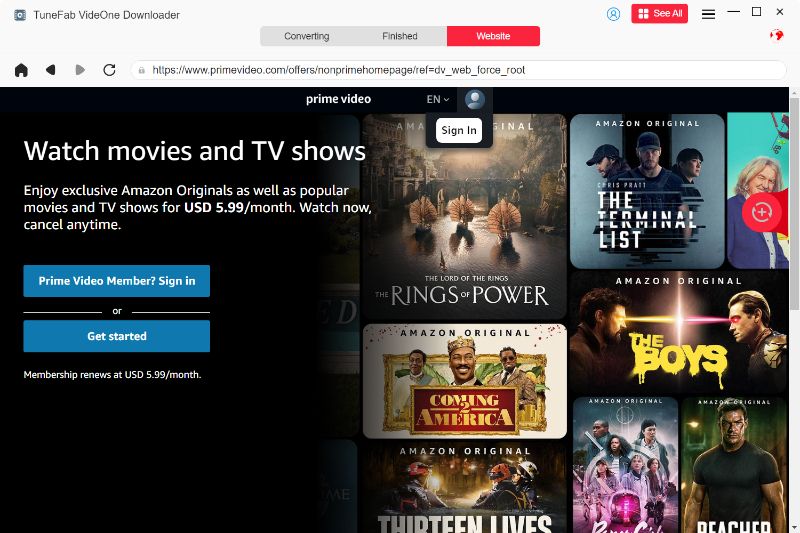
Step 1. Download, install, and launch the app on your computer, enter Amazon Prime Video, and then log into the web player from the home screen.
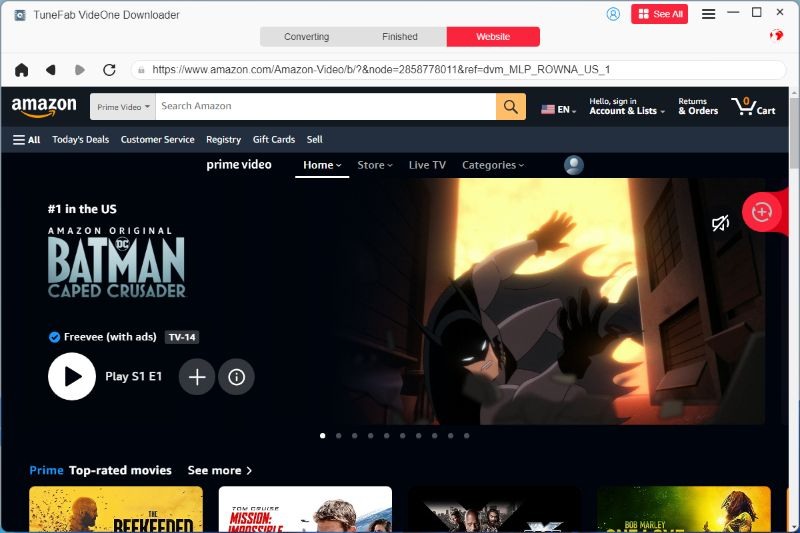
Step 2. Search for the video/show you want to download on the inbuilt web player and press the download button that is on the right of the address bar.
Step 3. When a new window pops up, adjust the output format, quality, subtitles, and even the output path. Select all videos and hit the download button.
Note: If your external hard drive has been already connected to your computer, you can directly change the download output path of TuneFab VideOne Amazon Downloader to a folder of your hard drive, and all videos that are to download will be directly downloaded to it.
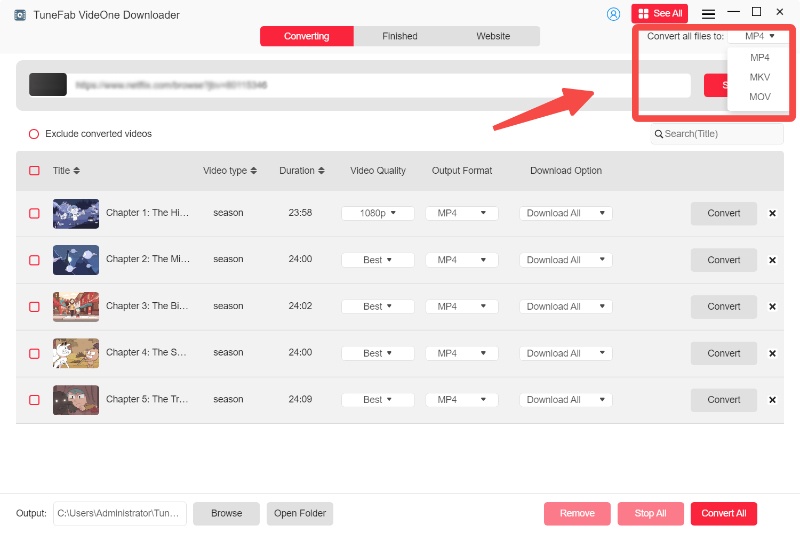
If you download videos before changing the output folder, moving the downloaded MP4 files to an external hard drive is also a very simple task. Follow the steps below to move them:
Transfer Downloaded Amazon Videos from Windows to External Hard drive
Before transferring, please check your external hard drive’s storage space to ensure a smooth transfer process.
Step 1. Connect the hard drive to your Windows computer with a USB cable.
Step 2. Open the TuneFab VideOne Amazon Downloader, navigate to the “Downloaded” section, find the downloaded movie you want to move, and click the “View Output File” and you can view all downloads in a folder.
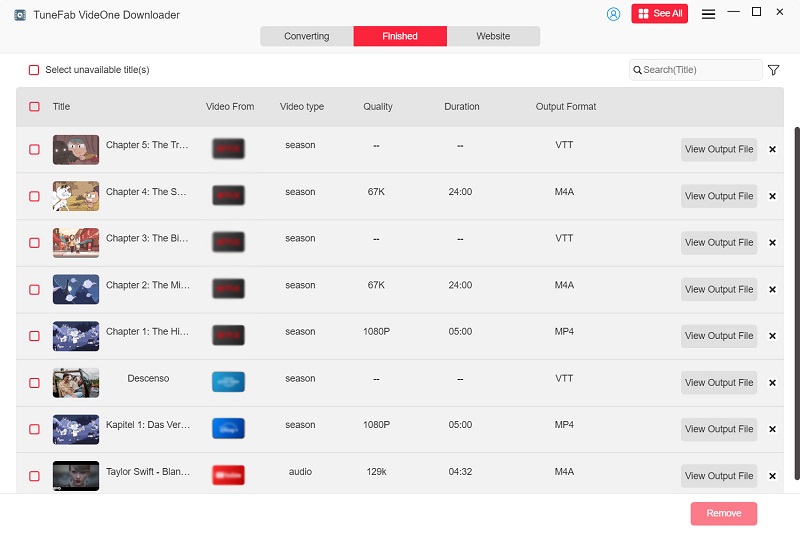
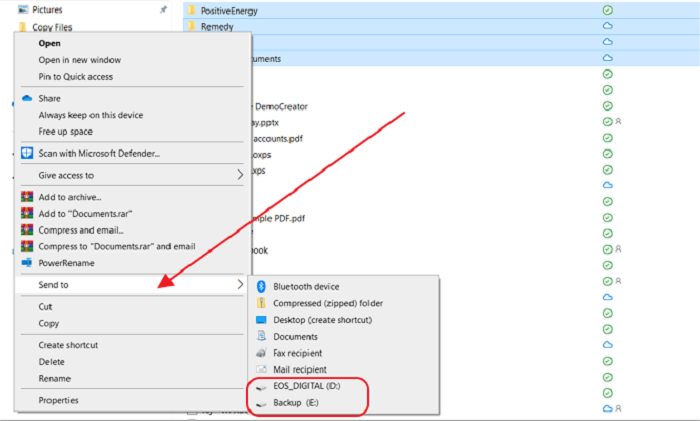
Step 3. Open “This PC”, select the folder corresponding to your hard drive, and simply drag and drop the MP4 files from the output folder into the folder on your hard drive.
Transfer Downloaded Amazon Videos from Your macOS Device
Before starting the transfer, please ensure you are using a compatible hard drive. If the one you are using is in a non-compatible format like NTFS or HFS+, format it or just try another one.
Step 1. Connect your external hard drive to your Mac with a USB cable. It should appear in Finder if it’s compatible.
Step 2. Open the TuneFab VideOne Amazon Downloader, navigate to the “Finished” section, and click the “View Output Folder” icon to locate the output folder.
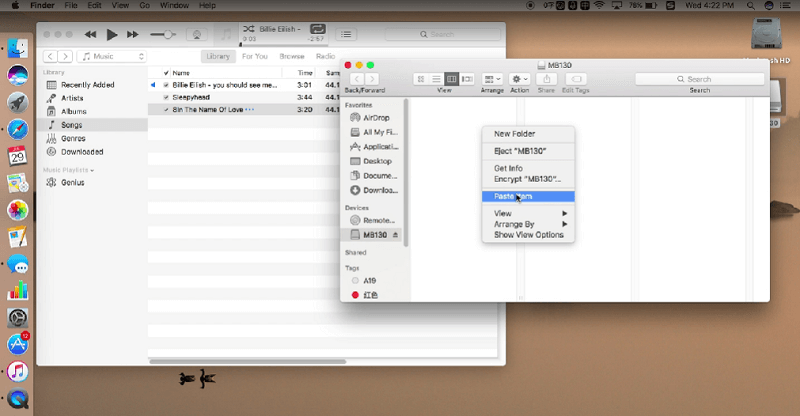
Step 3. Select and drag the downloaded MP4 videos to your external hard drive.
After the transfer finishes, you own them permanently and can enjoy unlimited share and uninterrupted offline playback whenever you want. By the way, the steps to download Amazon Prime movies to USB are nearly the same as your downloading them to the external hard drive mentioned here. Have a try by yourself first.
Related Article:
Summary
You can easily download Amazon Prime videos to external hard drive in two ways. One is using the Prime Video app and changing the output location, and the other one is downloading videos from Amazon Prime to MP4 with TuneFab VideOne Amazon Downloader and then moving them to your hard drive.
While Amazon poses limitations on downloading videos to an external drive from its official app, TuneFab VideOne Amazon Downloader emerges as a powerful solution. With its help, you can download the wanted videos to HD MP4/MKV/MOV in advance, making your process of saving Amazon Prime videos to an external hard drive a breeze. Try it today to embrace seamless offline viewing and elevate your effortless share with your friends for incredible Amazon content.
