How to Embed a YouTube Video in PowerPoint: 6 Easy Ways
By Gisela Werber
Updated on Nov 26, 2025
24.4K views
5min read
Learning how to embed a YouTube video in PowerPoint is crucial for students, teachers, and professionals who want to create more engaging and appealing presentations. Properly inserting a YouTube video can greatly boost audience engagement, make complex ideas easier to explain, and improve the overall impact of your slides.
Are you aiming for a standout PowerPoint presentation? Keep reading! This guide explains how to embed a YouTube video in PowerPoint for Microsoft 365 and even 2010/2007 through 6 effective ways. You will also learn how to download YouTube videos for offline use in PowerPoint, ensuring smooth and uninterrupted presentations.
Part 1. How to Embed a YouTube Video into PowerPoint Online?
If you have a stable internet connection, inserting an online video from YouTube directly through PowerPoint’s built-in features is the most efficient way. This part will introduce 4 simple methods to embed a YouTube video in PowerPoint for smooth online playback.
However, since these methods heavily rely on the internet, you may run into unexpected issues like video loading failures or stuttering during presentations. For a more stable, offline solution, feel free to jump to Part 2, where you will explore how to embed YouTube videos in PowerPoint as offline video files.
Method 1. Use YouTube Video URL
The easiest way to embed a YouTube video in newer PowerPoint versions like 2016, 2021, 2024, and Microsoft 365 is by using the video link, ensuring the video retains its original quality. Here are the specific steps.
Note. To embed a YouTube video in PowerPoint for Mac, make sure you are using PowerPoint 2021 or later, as the earlier versions of PowerPoint for macOS do not support inserting an online video.
Step 1. Copy the URL of the YouTube video you want to embed in the address bar.
Step 2. Open the presentation and go to the slide you wish to embed the video in.
Step 3. Click the “Insert” tab on the toolbar, and choose “Video” > “Online Video…”.
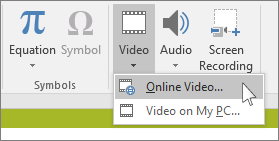
Step 4. Paste the copied YouTube link and confirm your action by clicking “Insert”. Then, adjust the video size to fit your slide as you want.
Step 5. Select the video on the presentation slide and click “Playback” > “Start” > “Automatically”. This way, you can embed a YouTube video in PowerPoint to play automatically.

Method 2. Use YouTube Video Embed Code
This method is an ideal option for those using older PowerPoint versions like 2010, 2013, or 2016. While more tedious than inserting links, this route offers more flexibility to customize appearance and playback. So, if you want to embed a YouTube video in PowerPoint with start and end times, this works. Let’s see how to do it step by step.
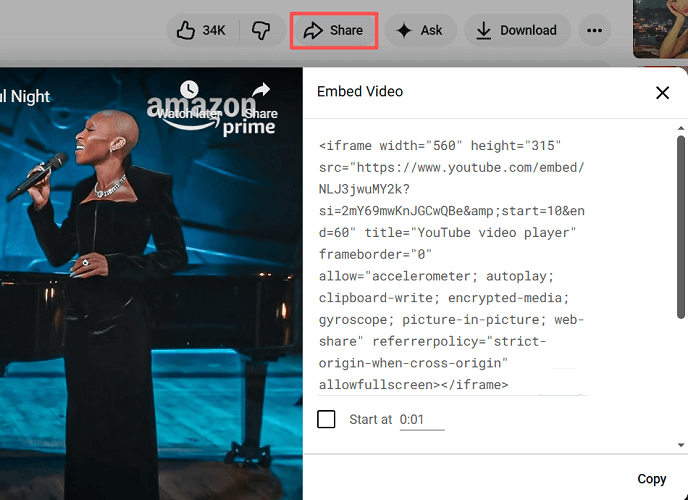
Step 1. Click “Share” under the video, followed by “Embed”.
Step 2. Enable the “Start at” checkbox and enter the time you need. Then, manually edit the URL in the embed code box to set the end parameters “&end=seconds”. Then, you will see the link that looks like this:
https://www.youtube.com/embed/0FjtZz-zWWs?si=noKXB4SQxCFQR3Ao&start=10&end=60
Step 3. Click “Copy” to save the generated HTML code to your clipboard.
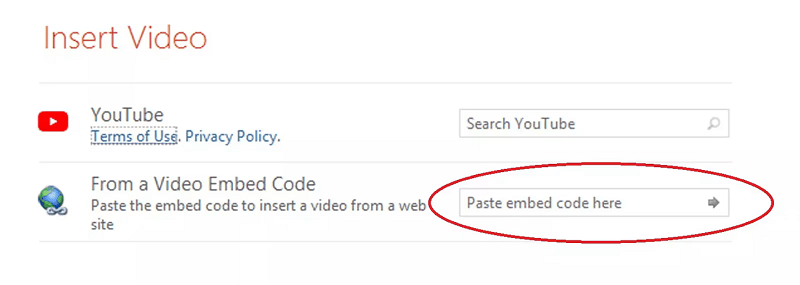
Step 4. Click the PowerPoint slide and click “Insert” > “Video” > “Online Video”.
Step 5. Paste the code in the provided slot (From a Video Embed Code) and press enter or “Insert”. Then, your embedded YouTube video will start and stop at your customized times.
Just a Heads-Up:
YouTube videos embedded via URL will contain ads. To insert a YouTube video into PowerPoint without ads, it is better to first convert the video to MP4 using a reliable third-party tool such as TuneFab VideOne YouTube Downloader, then embed it for offline playback. Check out Method 5 for more details.
Method 3. Search for YouTube Video Directly on PowerPoint
For PowerPoint 2016 & 2013 users, the built-in search feature makes things even easier. It lets you search for YouTube videos directly within PowerPoint, saving you the step of switching to a browser or copying the URL. Check out the steps below to see how to embed a YouTube video in PowerPoint via the built-in search engine.
Step 1. Open your PowerPoint 2016/2013 presentation and select the slide where you want to place the video.
Step 2. Go to the “Insert” tab on the toolbar, then click “Videos,” and then select “Online Videos.”
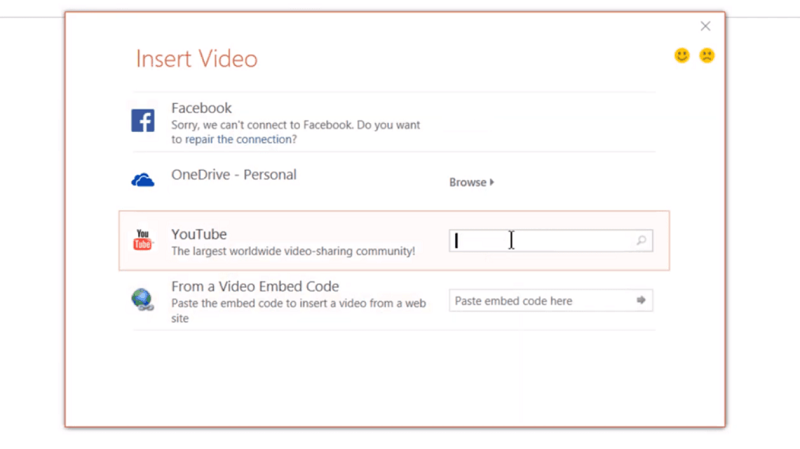
Step 3. You will see a YouTube search box. Enter keywords to search for the video you want.
Step 4. Select the video from the search results and click “Insert” to embed the video in PowerPoint. You can then move and resize the video on the slide.
Method 4. Insert YouTube Video as Hyperlink
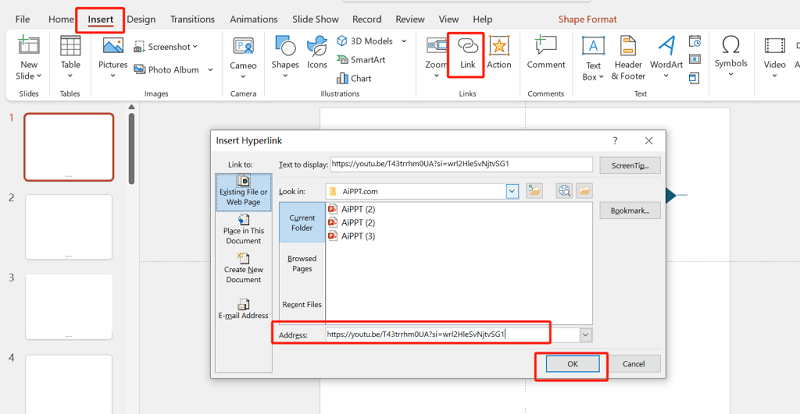
This is the simplest and most compatible method for how to embed a YouTube video in PowerPoint, because it doesn’t involve true “embedding”. Instead, it creates a clickable link. When you click the link during the presentation, you can effortlessly open the YouTube video in your default browser. Here are the detailed steps:
Step 1. Copy the full URL of the YouTube video.
Step 2. Select an element on your slide, such as text, image, or icon.
Step 3. Right-click the element and choose “Hyperlink…”. Then, paste the YouTube URL into the address bar and click “OK”.
Step 4. During your presentation, clicking this element will take you directly to the YouTube video you need.
Part 2. How to Embed a YouTube Video into PowerPoint as MP4 Offline: 2 Ways
In the previous section, we discussed how to embed YouTube videos in PowerPoint for online playback. However, weak Wi-Fi, restricted internet access in the company or school, can lead to embedded videos failing to load, buffer endlessly, or not playing at all. In such cases, embedding YouTube videos into PowerPoint offline is a better option. Below are 2 practical methods to do this.
Method 5. Download a YouTube Video for PowerPoint Offline (Highest Quality)
The best solution is to use a video downloading tool like TuneFab VideOne YouTube Downloader. Available on Windows and Mac, this tool allows you to get rid of all the download limits, save videos, movies, playlists, channels, etc from YouTube in MP4 format that is compatible with PowerPoint. After that, whether it is the older PowerPoint 2007/ 2010 or newer versions, you can easily embed YouTube videos into PowerPoint without ads, ensuring seamless offline viewing for enhancing your presentations.
Discover More Key Features of TuneFab VideOne YouTube Downloader:
- Feature an inbuilt YouTube web player for direct video searching.
- Download all content from YouTube to MP4, MKV, and MOV.
- Retain up to 8K high-definition for all YouTube downloads.
- Support batch-downloading YouTube videos at 3X faster speeds.
- Preserve original audio and subtitles for YouTube downloads.
A big surprise, isn’t it? Let’s see how to use it to download YouTube videos and embed them into your presentation.
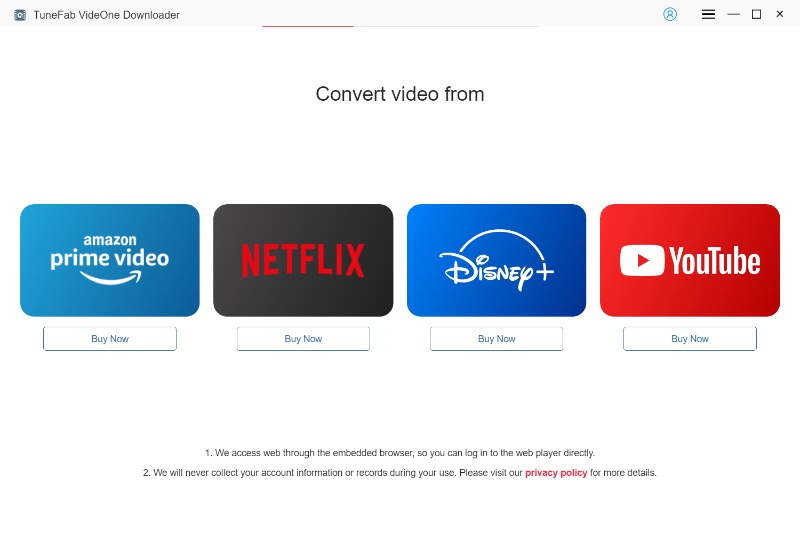
Step 1. Get TuneFab VideOne YouTube Downloader Ready
Download TuneFab VideOne, install it, and run it. Select YouTube from the video services, and log into your account from the built-in web player.
Step 2. Find YouTube Video to Download
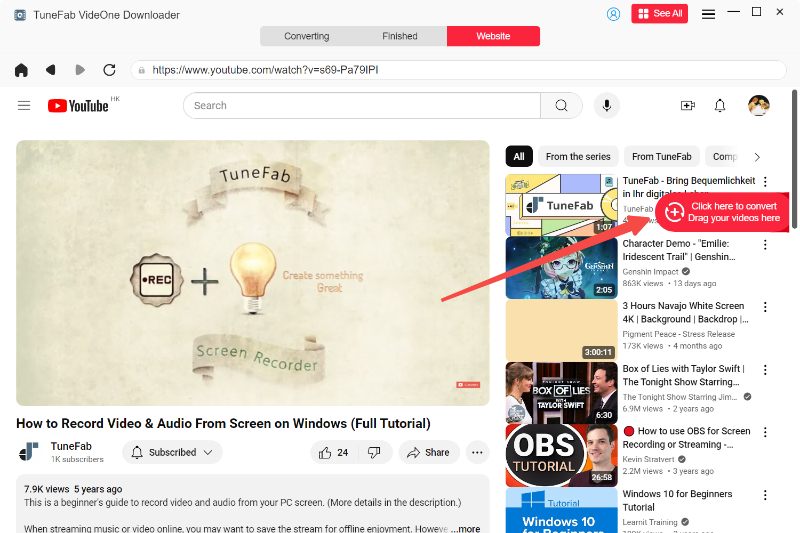
Locate the video you want to embed in PowerPoint and then click on its download icon next to the address bar to fetch video information and add it to the conversion queue.
Step 3. Customize Output Settings
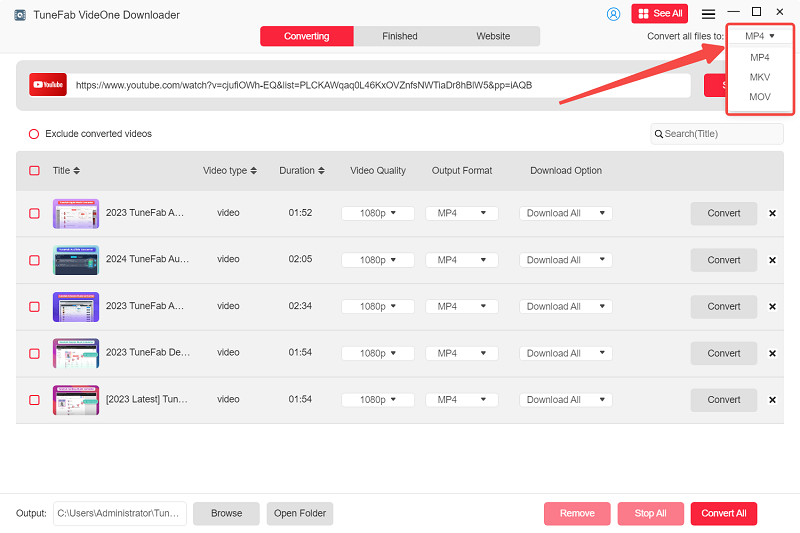
On the pop-up windows, use the dropdown lists to choose a proper output format. MP4, MKV, and MOV are supported by PowerPoint. Also, adjust other video parameters like output quality, video languages, subtitle language, and more based on your needs.
Step 4. Download YouTube Videos for PowerPoint Offline Playback
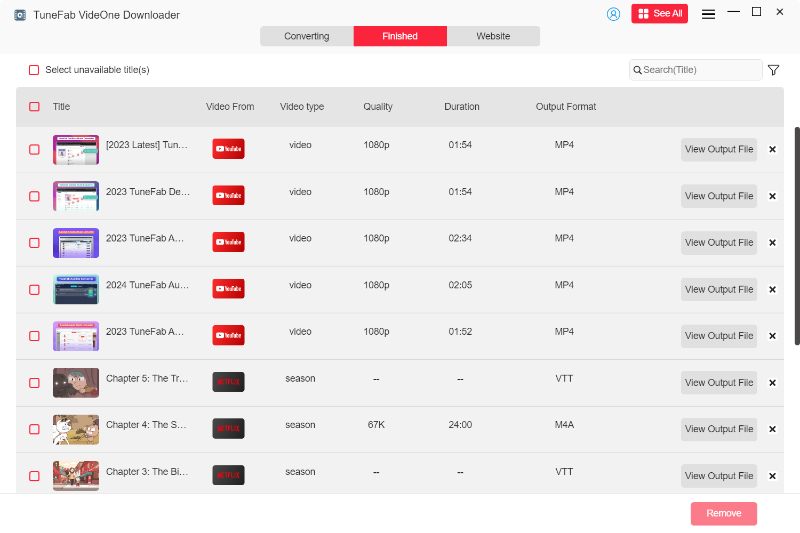
Click “Download” and TuneFab VideOne will start the conversion. Once complete, you can go to the “Downloaded” tab and click “View Output File” to locate YouTube downloads on your computer.
Step 5. Embed a YouTube Video in PowerPoint Without Internet
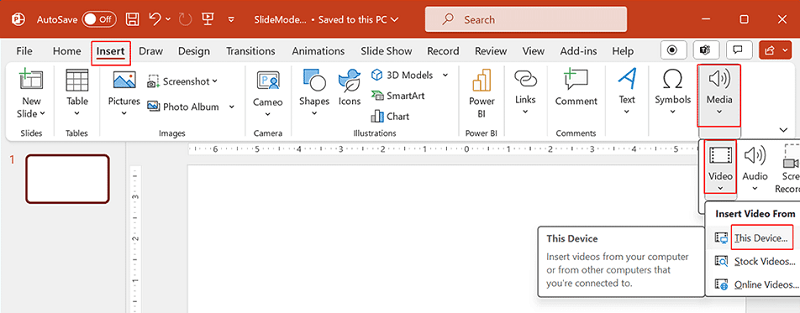
Go to the slide in your PowerPoint, click “Insert” > “Video” > “This Device”, then locate and double-click your downloaded YouTube video file. Then, you have successfully embed a YouTube video in PowerPoint on Mac/Windows. Adjust the size and position as needed by dragging the edges.
Further Readings for How to Embed Online Videos in PowerPoint:
Method 6. Use PowerPoint Screen Recording
A reserve for PowerPoint 2013 or later, screen recording is an ideal option for selective capturing of moments within a YouTube video. Here’s how to embed YouTube videos on PowerPoint to play without the internet via screen recording.
Tip. Screen recording often results in lower quality and requires precise timing, along with uninterrupted streaming during the recording process. For a smooth and high-quality experience, TuneFab VideOne YouTube Downloader is a better choice.
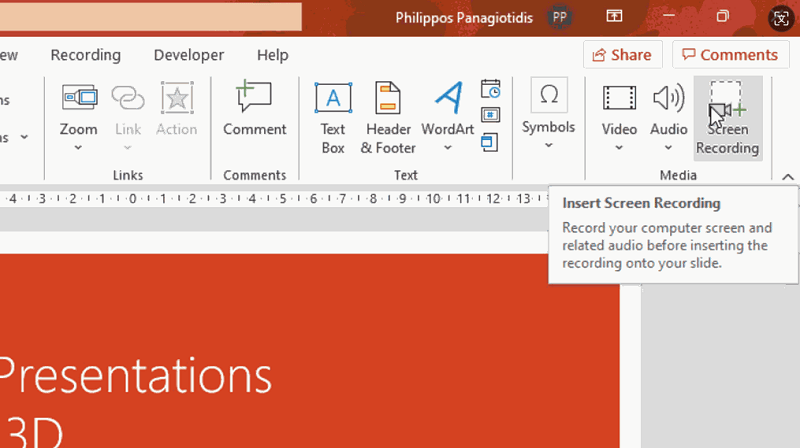
Step 1. Open the presentation and scroll to the slide you wish to insert the recorded YouTube video. Click “Insert” > “Screen Recording”.
Step 2. Open the YouTube video you wish to embed and click “Select Area”. Drag the box to control the recording dimensions. If you want to remove the pointer or audio, click their respective buttons to deactivate them.
Step 3. Click “Record” and start playing the video. You can “Pause” if you want to remove portions of the video from your recording. Tap the stop button (blue square) after your recording is over.
Once satisfied, click “Save” from the “File” tab, and the YouTube video recording will embed into the chosen slide.

FAQs About Inserting a YouTube Video into a PowerPoint Presentation
Q1. How to get embedded YouTube video to play automatically in PowerPoint?
If you want the embedded YouTube video to play automatically as soon as the slide appears, follow the steps below:
Step 1. Select the video in your slide.
Step 2. Go to the “Playback” tab on the top toolbar.
Step 3. Click the down arrow of “Start” and choose “Automatically” from the list.
Step 4. Start “Slide Show View” or “Presenter View” to check if embedded YouTube video is playing automatically when switching to the slide.
Q2. Why won’t my YouTube videos play in PowerPoint?
This is the most common issue when users attempt to embed a YouTube video in PowerPoint. If your video does not play, here are the potential causes:
- Incorrect embed link/code: Check that the link or embed code you copied is complete and valid.
- Unstable network connection: If you are inserting online videos in PowerPoint, a stable internet connection is required.
- Video removed: The YouTube video may have been removed by the uploader. To avoid this, you can use TuneFab VideOne YouTube Downloader to download the YouTube video to your computer beforehand.
- Outdated Software: Upgrade your PowerPoint to the latest version. If your PowerPoint version is too old, online video embedding is not supported.
- Unsupported local video format: If you are adding a local video, make sure it is in a PowerPoint-compatible format, such as MP4, MOV, M4V, AVI, and more.
Final Verdict
This article has guided you through how to embed a YouTube video in PowerPoint on Windows and Mac in 6 effective methods. While Microsoft provides several built-in ways to insert online videos, most of them require an active internet connection for playback.
That is why TuneFab VideOne YouTube Downloader stands out as the best solution for embedding YouTube videos into PowerPoint slides. It can batch download 8K MP4 videos, letting you easily add high-quality YouTube videos to your presentations without worrying about ads, network connection, or any online playback issues. Download it today and give it a try!
